 GitHub Repo Navigator
// Chrome extension
Every repository, right in GitHub's menu
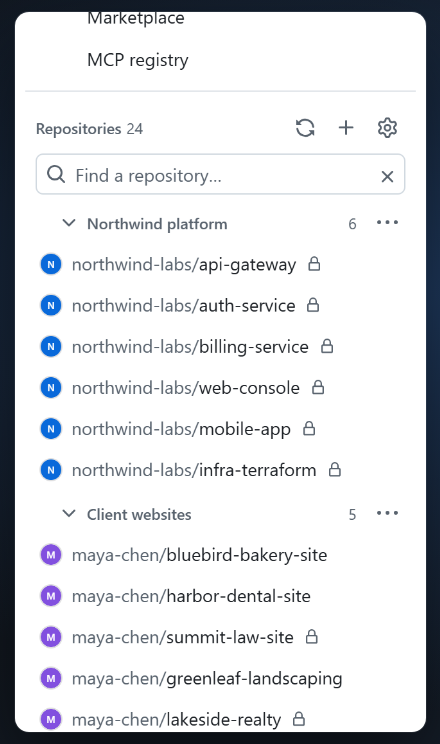
GitHub shows about ten "Top repositories" and hides the rest behind "Show more". Repo Navigator replaces that short list with every repository you can access, organized into your own sections.
Coming soon to the Chrome Web Store
// What it changes
Two places on GitHub, nothing else
The ☰ menu
The button at the top-left of any github.com page. Its Top repositories section becomes your full, organized list.
The dashboard sidebar
On github.com's home page, the Top repositories list on the left becomes the same organized list.
Both places show the same sections. If GitHub changes its page layout in a way the extension does not recognise, it steps aside and GitHub's own list stays in place.
// Features
Built for people with a lot of repositories
Complete list
Every repository you can reach, read from GitHub's official API: your own, your organizations' and ones you collaborate on.
Your sections
Create, rename, reorder and collapse sections. Drag repositories between them, or use the keyboard.
Organize automatically
"Suggest sections" groups repositories by name, owner, description and language. Preview, edit, apply, or undo.
Instant filter
Type a few letters to filter the whole list across every section. Enter opens the first match.
Synced
Your sections follow you to every Chrome where you use Chrome Sync. Export and import them as a file too.
Read-only and private
Read-only access to repository metadata. No server: it talks only to GitHub. Tokens never leave your device.
// Setup
About three minutes, once
The extension's settings page walks you through every step with a checklist that verifies each one.
- Create your GitHub App. The extension signs in through a small GitHub App that you own, limited to read-only repository metadata. The settings page opens GitHub's form already filled in and tells you the one box to tick (Enable Device Flow). Paste the app's Client ID back.
- Connect. Click Connect GitHub, enter the short code it shows at github.com/login/device, and click Authorize.
- Install the app on your account with All repositories. The guide links straight to it and checks again when you come back.
- Open GitHub. Click ☰, or open the dashboard. Optionally click Suggest sections.
// Support
Getting help
Most questions are answered on the extension's own settings page, which shows what it can see and what to fix. Common ones:
| Symptom | What to do |
|---|---|
| Nothing looks different on GitHub | The list is inside the ☰ menu (top-left) and on the dashboard's left sidebar. Other pages are unchanged by design. |
| "Only public repositories are showing" | The GitHub App is not installed on your account yet. Click Finish setup and install it with All repositories. |
| Organization repositories are missing | Install the app on that organization with All repositories, or ask an owner (the setup guide has an install link to send). For SAML organizations, sign in to the organization on github.com, then reconnect. |
| "Device flow is not enabled" or "client ID not recognised" | The settings page shows exactly what to change in your GitHub App, with a link to it. |
| Sections do not reach another device | Check that Chrome Sync is on, including the Extensions toggle. Or use Export sections and Import sections. |
| "Authorization expired" | Settings, then Reconnect GitHub. Your saved list stays visible until then. |
Still stuck, found a bug, or have an idea? Get in touch. Mention your Chrome version and what the settings page shows.
// Privacy
Private by design
No server, no analytics, nothing sent to the developer. The extension talks only to GitHub, with read-only access to repository metadata, and keeps its data in your browser. Read the privacy policy.